
Interested in learning more about how implement library centers in your school library? You've come to the right place.
Today's post is written by Connie Robinson, a National Board Certified Librarian. Connie has spent 11 years as a librarian at Bramlett Elementary in Oxford, MS.
For more information on library centers, check out our Library Centers eCourse.
My 50 minute library class for second graders is divided into 3 segments - whole group instruction, centers, and check-out. Center time usually lasts 12-20 minutes. The class is divided into 5 groups for 5 centers. Each group has no more than 6 students and no less than 3 students. I assign students a ‘spot’ - a ‘square’ - on the whole group, alphabet area rug. The rug has 5 rows therefore creating my 5 groups. A pocket chart displays the 5 centers with a group assigned to a center.
Students attend library class once a week and they go to one center a week. The next week, I move the center signs so that each group will go to a different center than the week before. In 5 weeks, all students have participated in each center.
At the end of the whole group instruction, I dismiss the groups one row at a time to their center. Center Rules include: (1) Voice Level One (whisper) (2) Work Together (take turns, help each other) (3) Stop, Clean Up, Stand Up at the sound of the timer.
Each center has an instruction sheet displayed in an 8 x 10 acrylic photo frame. Instruction sheets provide simple ‘I can’ statements that remain at each center for students to follow. During Library Orientation at the beginning of the school year, we take a tour of the library intruding the centers.
Five Library Center Ideas
These five centers work well with my 2nd grade students and also work for other grade levels:

Author Center
Supplies: Rory’s Story Cubes, Container for cubes, Instruction Sheet
Students circle up to work together to create a story. Each student takes a cube from the container. The student holding the container begins the story based on the picture they choose from their cube. The next student in the circle adds to the story using a picture from their cube. The last person in the circle ends the story. If the timer has not gone off, the container passes to the next person to begin a new story, at which time students can trade their cube for a new one if they so desire.
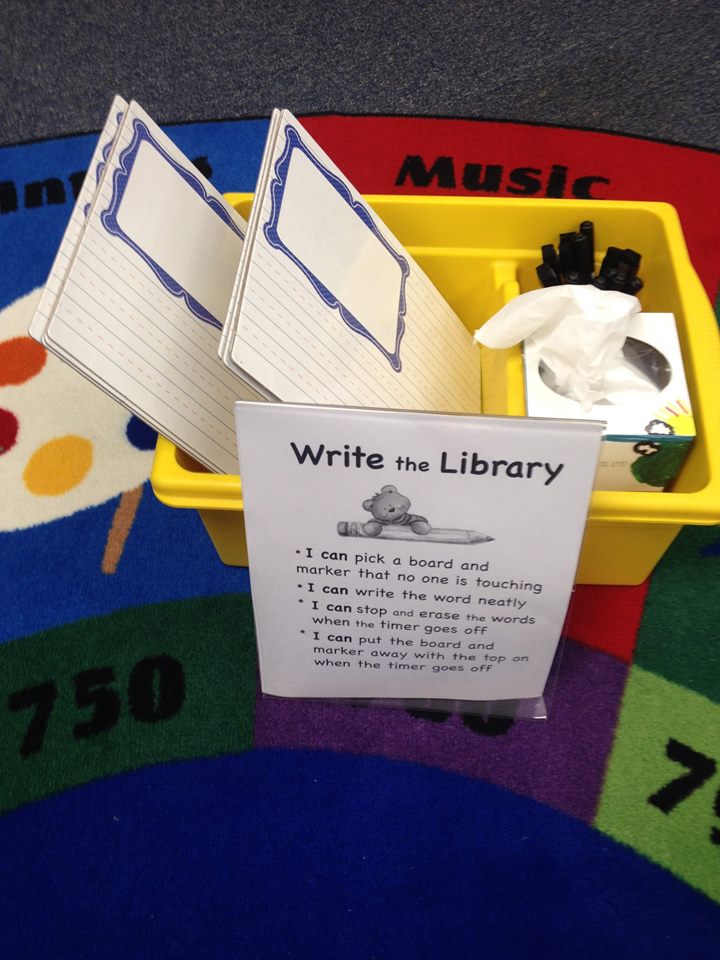
Write the Library Center
Supplies: Dry Erase Boards, Dry Erase Pens, Tissue box, Word Cards (with pictures, optional), Container for supplies, Instruction Sheet
Word Cards or words (and pictures) relating to library and books are printed from the computer and posted around the library, such as ‘author,’ ‘illustrator,’ etc. To keep students from disturbing other centers, they are posted in a central location. Each student gets a board and pen from the container. Students hunt to find the words and write them on the board in their best handwriting. Six words are posted. If the timer has not gone off when all the words are written, students draw a picture on their dry erase board as if they are an illustrator.
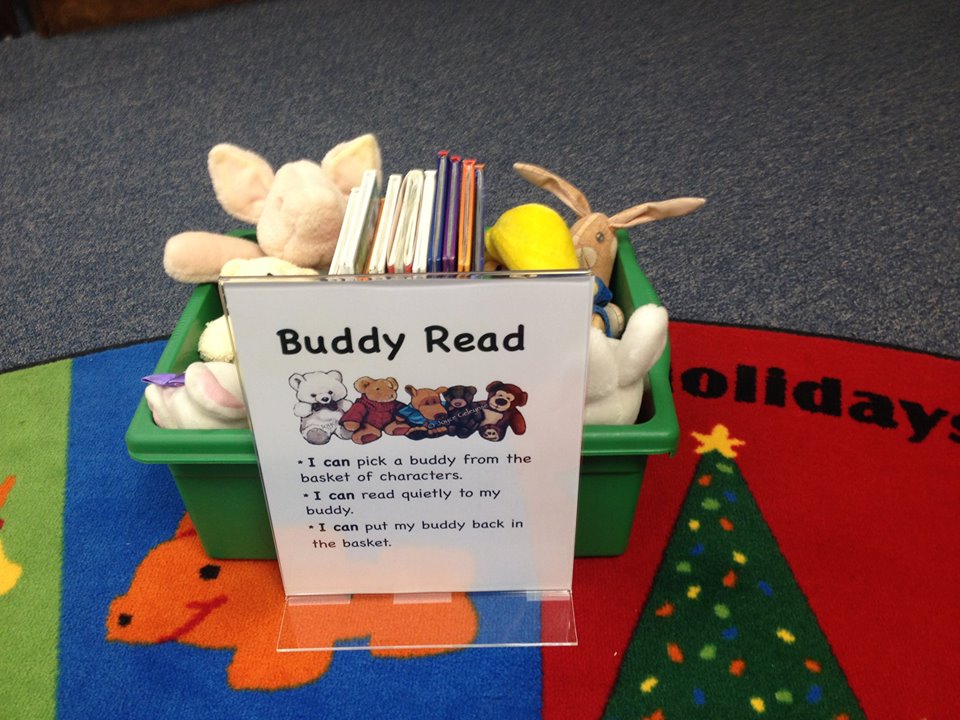
Buddy Read Center
Supplies: Stuffed Characters, books, container for books and characters, instruction sheet
Students select a stuffed character and book from the container. Students find a place on the area rug to cuddle with the character, sitting or stretching out to read quietly.
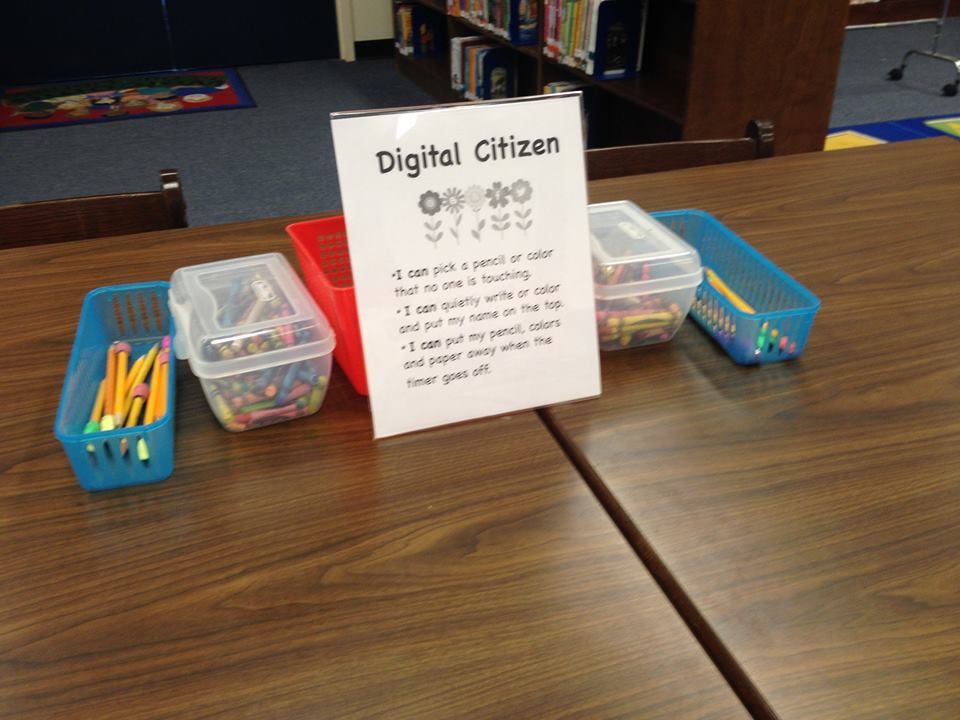
Digital Citizen Center
Supplies: Worksheet, pencils, colors, container for supplies, teacher boxes, instruction sheet
Students get a worksheet, follow instructions and put completed sheet in their teacher’s box. I collect sheets all year to create a Digital Citizen booklet. Prior to each worksheet (every 5 weeks), a Digital Citizen lesson is taught in large group from Common Sense Education at the Common Sense Media website (www.commonsensemedia.org). For example, in my first lesson I used an Internet Safety lesson “Going Places Safely” where students viewed a 3 min. video “My Online Neighborhood” followed by class discussion and worksheet description.
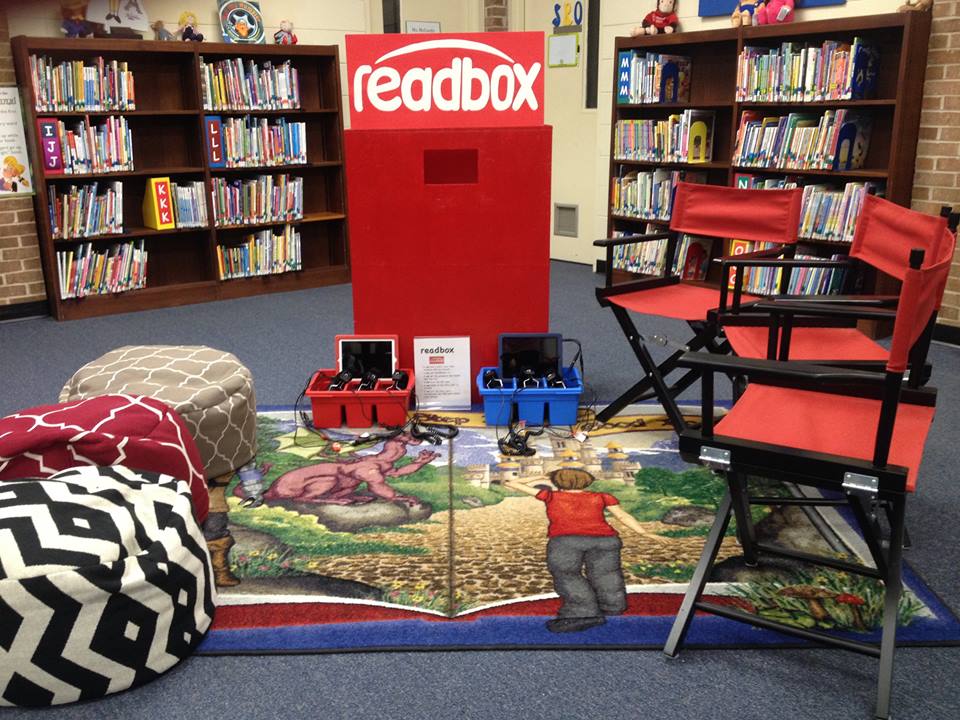
Readbox Center
Supplies: iPads with QR Reader app, headphones, splitter if more than one headphone is needed per iPad, story cards with QR codes (created with QR code generator or purchased from TPT website), Instruction sheet, containers for supplies, Bean bags (optional), Redbox (optional)
Students pick a story card, scan the QR code with the iPad and listen/watch the story with headphones. I created Readbox from a refurbished bookshelf. (Painted red, cut out an opening, added ‘Readbox’ header, hot glued a basket on shelf just inside the opening.)
Students are enjoying participating in the activities in the library in small groups with their peers. The variety of centers allows for students to work with others or work independently, have a passive role or an active role. The center I worried students would not responding well to (Author Center) turned out to be one of the most enjoyed. Students responded with “I wish we could write down our story!” Their idea impressed me so much we will be incorporating that aspect later in the year.
Not a member of Elementary Librarian? Join today to access 101 Library Centers, our massive collection of center plans for grades K-5.
Dear Connie,
This is EXACTLY what I was searching for to implement in my K-5 library!! Your schedule aligns well. Additionally, you have provided excellent descriptions and photos for delivery.
I am so excited to start building on this for the next school year. Thank-you so much for sharing your ideas.
I would like to know more about what you do in your whole group time. I would like to try incorporating centers and this is a great start. Thank you.
Hi Jamie! I have students for 45 minutes. For my second graders who use the centers, we have large group time for 20 minutes. We have about 5 minutes of Status of the class and business (Return/Renew books, responsibility check, reading awards). Then I do a lesson; anywhere from Non-Fiction Text Features to Digital Citizenship.
Where did you get the story cubes?
Kim, I purchased these at Cracker Barrel. 🙂
I found all of them on Amazon, Prime eligible, for about $34. That was the originals, voyages and actions plus the Max set. That should be more than enough to get started with... maybe all I'll ever need.
Great ideas- love the centers . Thanks for sharing.
Thank you Phyllis!
It's great to see another approach to centers. It helped me to be clearer about how I can use them. Thanks!
I went to Pinterest, looking for your readbox. I saw many, but not like yours. I'd like to have more information about how you made it and how you use it.
Great article!
Thanks GayLynn!
I actually found a book case that someone was discarding! I guess you could say "Someone's trash is someone else's treasure!" I spray painted it red, my husband sawed an opening just above the shelf on the backside (which becomes my front) so that I could put my basket on the shelf where the students could reach in. I traced the letters "Readbox" on red poster board and cut them out to show the white poster board on the other side and this became my header. On the back (which was formerly the front of the book case), I covered it with red bulletin board paper, just to complete it and make it look presentable on the other side. I originally was looking for a refrigerator box to make it. So it can be made any way that works best for you.
Story cards (which is a picture of the book cover with a QR code printed and laminated) are in the basket. Students pick a card from inside the Readbox opening, scan the QR code with the iPad and listen to the story. These QR stories can be purchased from Teachers Pay Teachers (TpT) or you can create your own by going to YouTube searching for books read aloud, paste the URL into SafeShareTV, and then again paste into a QR generator. From there, print the QR code and laminate.
I hope this information helps!
Thank you so much. Those directions are great and I'm definitely using that idea. Awesomesauce!